Tuesday 22 August 2017

Net Metering and A Partial Solar Eclipse


The very high-tech eclipse-viewing beer box.
Time is funny. It's been a year since my last post and it feels like not more than a couple of months. The calendar says I'm getting old at lightening speed but the good thing is time is going by so fast I haven't even noticed.

I wanted to add this post back in April when our solar panels were fired up but I also wanted to have some data from Hydro One to make it a bit more interesting.

But before I get to the whole story, were you able to enjoy the solar eclipse this week? Thanks to my cousin Jamie, we got to see the eclipse with her beer box pinhole camera. None of us have the super-human eyeballs the US Prez has so we witnessed the eclipse this way.

There were many ways people were watching the eclipse. Some were using colanders, binoculars held backwards projecting the image onto a surface, pie plates with pinholes, those fancy and very sensible eclipse glasses, and I'm sure there were many, many more creative methods people thought up to avoid burning out their eyeballs.

My personal favourite way to watch the eclipse was using the online version of our inverter's solar production report. I thought this was cool because I am a self-described energy geek. Thankfully, it was a perfectly sunny day so the resulting graph showed the eclipse quite perfectly. I enjoyed the whole excitement around trying to view the eclipse but I'm happy it'll be another 7 years before the next one. It seriously cut into our solar production. Jeez!

The graph from the PV array of a perfectly sunny day in June.

The graph from the PV array of a perfectly sunny day
with a partial solar eclipse.

Ok, enough about the eclipse. I just hope you all don't have sun spots blocking your vision while you're trying to read this.

As I mentioned earlier, our solar panels started producing electricity in April. We have 19 - 260 watt panels on the roof, equaling 4,940 watts...just shy of 5 kilowatts.

Casa Tortuga's 5 kilowatt photo voltaic (PV) array.

The panels sit silently up on the rooftop making many kilowatts for Casa Tortuga 

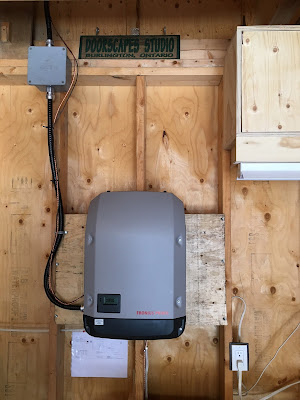
The inverter sits silently in the garage making sunshine
into electricity.

The net meter silently keeps track of what we take from the grid and what we
return to the grid. I was right giddy the first time I saw the meter spin backwards.
Well, these digital meters don't actually have any spinning parts but the dashes
under the number move to the left when we are sending kWhs to the grid.

Net metering is the coolest! And silent.

We get to make our own power when the sun is shining. First and foremost, the house uses the electricity our panels produce. We send any excess electricity the house can't use at peak production times back to the grid for a credit on our hydro bill, and then when it's dark we get to use the hydro grid to power the house. It works, silently, like a charm!

We've learned to use sunshine as our Hydro time-of-use. When the sun is shining we do laundry, run the dishwasher and the dehumidifier. When it's rainy or dark...laundry and dishes simply just have to pile up! Why pay a delivery charge for kWhs delivered to us from the grid when we can just use our own kWhs and therefore not get hit with the delivery charge? Yes, I warned you I was an energy geek.

Before our panels went live our average monthly bill was about $220. Hydro is the only utility we use to run this house, no propane, natural gas or oil, and no wood. We both work from home and therefore use electricity many more hours per day than folks who work away from home. And my shop, which was not built to passive house standards but better than conventional standards, is included in those monthly bills.

The Hydro bill is a joy to receive now. The average monthly bill is currently about $25. We have only received 3 bills so far that are completely on the net metering system, two of which we produced enough to be able to receive a generation credit. I know that it won't be that low through the winter but right now it is and we have built up some credit because we produce more electricity than we use so that will help to lower the first couple of winter bills at least.

Deciphering the first Hydro bill was a bit of a challenge. I finally did figure it out though. Basically, Hydro One reduces our bill by offsetting the exact number of kWhs we used with the same number from the kWhs we returned to them. This leaves only the basic monthly charge (which is calculated on the number of kWhs we take from the grid) plus HST. Any excess we have returned to the grid gets banked and credited at a time when we are actually taking more from the grid than sending back.

Here's what last months bill looks like.

A history of Casa Tortuga's electricity use.

What we took from the grid for the month.

What we sent back to the grid and the calculation of our credit
 and banked credits.


It sure beats the $220 monthly bill. We figure it should take about 10 years for the system to pay for itself. After that, the panels are warranted to continue working for at least another 10-15 years...for free. By then I really will be old and probably won't remember there's solar panels on the roof anyway!

Life is good when you make your own electricity.

Cheers,
Mimi


Monday 29 August 2016

Inside Passive House CasaTortuga


We are closing in on one full year of living in the house now. It has been wonderful. I don't think either of us has missed Priscilla for even one second.

I'm still puttering along with finishing the bits that need finishing. The pantry is the next big project I'll soon be gearing up to start. The last couple of months has been dedicated to finishing the interior of the screened porch. It's finally done now too. At this time of the year it is the best room of the house. I will have to attempt to photograph it to show it off too but the quality of the pictures will be nothing like the ones that follow.

These pictures are some of only a few that you will find on the Kendel-Dezoete Designs Houzz page. We would like to give a big shout out to Mike Dezoete for making the experience of tricking out a kitchen, 2 bathrooms and a laundry room/closet so enjoyable. By the time we finally found our way to Mike we were pretty overwhelmed by the whole process of building a house and having to make decisions about a million and one details. He made it fun again...and easy. Thanks Mike...you're the best!

So here is the main level of Casa Tortuga...

The kitchen is always the best room in the house. At this time of year the counter top is the same color as the leaves outside. It's almost like you're outside when standing at the sink, surrounded by green and the large window.
It makes doing dishes a little bit more pleasant...if that's possible.
                                                                                                                                               ~photo credit: RDZ Photography
The kitchen view from the dining table.
                                                                                                                                    ~photo credit: RDZ Photography
The living room view from the dining table.
                                                                                                                                    ~photo credit: RDZ Photography
The master bathroom (or "principle" bathroom as cousin Marie prefers. Actually, I like that better too.).
The barrier-free shower is in the background. Note the niche by the tub...tall enough to accommodate any wine bottle!
                                                                                                                                    ~photo credit: RDZ Photography
The view from the shower through the laundry/closet area into the principle bedroom.
                                                                                                                                    ~photo credit: RDZ Photography
The guest bathroom on the lower level. I still need to build the permanent vanity for this room. What is there now is
temporary...so guests have some place for toiletries when they visit.
                                                                                                                                    ~photo credit: RDZ Photography

That's it. The photographer was only here to photograph the kitchen and bathrooms. There are more photos that show more views of these rooms plus a couple more areas outside these rooms on the Kendel-Dezoete Designs page on Houzz. Check them out here: http://www.houzz.com/projects/1977084/passive-home-Lyndhurst

And now for the not-so-high-quality photos...

The recently completed screened porch, looking west. Absolutely the best room of the house at this time of year!
The ceiling actually isn't arched. The only way I can take a photo of a whole room is with the panorama function
 on the iPhone's camera. That's the Turtle Falls workshop in the background...
where I spend most of my waking hours these days. 
Looking east in the screened porch. A wood-burning fireplace and WeatherMaster windows will allow us
 to use this room on those nice sunny days through the fall and winter.

That's all for now. I better get back to work...still many things to build for Casa Tortuga in the Turtle Falls workshop!

More later,
Mimi


Sunday 17 July 2016

Certified Passive House Casa Tortuga


Casa Tortuga's new welcome sign.
Five years ago we bought the piece of waterfront property we now affectionately call Turtle Falls.

Four years ago we started planning to build something. We had no idea what at the time.

Two years ago we started to build the house we call Casa Tortuga. We were striving for Passive House certification. It was a big leap of faith in an area where no other passive houses existed to help guide us on our journey.

We had 3 very dedicated men willing to help us achieve such a lofty goal. None of them had built a passive house before or had even heard of such a thing. They were meticulous in executing the details necessary to achieve passive house standards.

March 15th of 2016, we were notified that we had achieved Passive House certification.

Hallelujah!

The west end of Casa Tortuga...and the view you see as you drive up.
The south facing façade with enough overhang to keep the interior cool
during the hot summer days.


We still have landscaping to do. But we have the rest of our days to putz away at that. The kitchen designer is wanting to come by soon and photograph the interior...so you'll have to wait to see the inside until that has been done.

That's all for now. It's a gorgeous day here at Turtle Falls and I really would prefer to be on the dock than typing away at this computer.

More later,
Mimi


Welcome to Casa Tortuga...
one of Canada's newest
certified passive houses.


Saturday 16 January 2016

Insulation Insanity?

Time sure does fly when you're having fun. We have been living in the house now for 4 months and I am still puttering along on the interior finishing details. That's why I have been so lax with the blog posts.


Today's ramblings are about the insulation encapsulating Casa Tortuga. Insulation is one of the main components of a passive house. For the uninitiated, the amount of insulation we have in this house is a real head shaker. More often than not, folks will look at us in disbelief when the subject comes up and you can see them mentally calculating the expense of all that over insulation and then...well...they shake their head some more.


You be the judge. Here's what has gone into insulating this house...

14" (35.5cm) of XPS under the slab. That's an R-value of 70.
1" (2.5cm) of foil-faced polyiso/XPS between the stud wall and the concrete
foundation wall. This is the layer that gives us the continuous air-tight
envelope, bottom to top.
1" (2.5cm) foil-faced polyiso, making its way to the ceiling of the upper level.
This layer also serves as our vapour barrier.

The air-tight envelope is completed with the installation of
1" (2.5cm) polyiso on the ceiling of the upper level.

On the inside of the 1" (2.5cm) polyiso
is 6" (15cm) of Roxul mineral wool insulation.
On the outside of the concrete foundation, 2 layers of EPS Styrofoam
equal to 10.5" (26.6cm) is installed. Also, note the 16" (40.6cm) deep I-joist
cavities above the styrofoamed concrete foundation.
Those 16" (40.6cm) deep I-joists, installed all around the house above the
concrete foundation wall, get filled with dense-pack cellulose. The wall
system is now around R-72 (Roxul/polyiso/concrete/EPS) 
to R-90 (Roxul/polyiso/cellulose) when the Roxul, polyiso and cellulose
components are added together.
Last but not least, 28" (71cm) of blown-in cellulose in the
attic completes the passive house insulation. R-value here is around 80.

Well...are you shaking your head yet? Laid out in pictures like this it does seem a bit over the top. But the fact that the heat pump rarely gets past the ultra low setting on a cloudy day here in the winter makes it all worthwhile.

I will say the lack of a conventional heating system makes for a very comfortable living environment. You may know what it's like with the drier winter air and the forced-air heating...how you feel like you're drying up from the inside out, the chapped lips, the parched mouth, the itchy dry skin. Well...that doesn't happen here. Just one of the perks of insane amounts of insulation.

Gotta love it!

More later,
Mimi


Sunday 15 November 2015

Heating & Ventilation - Part 2

Now that the temperatures are starting to dip around these parts our minds are on staying warm indoors rather than cooling off in the lake. It's time to talk about how we will be heating Casa Tortuga.

Usually by this time of year, in any of our previous residences, I would have already been wearing a turtleneck for a few weeks and we'd have cranked the thermostat up to 24°C. The furnace would run almost constantly and there would be times, even though the thermostat said 24°C, there still seemed to be a chill that made me want to wear my turtleneck to bed. And I did sometimes...socks too. It was not fun...nor sexy for that matter. Anyway...

This is also the time of year when the clocks have been turned back and it's dark by about 4:30 pm that I wish I had a time machine that could fast forward through the dark cold months and transport us right into spring again.

This year sheds a whole new light on how I feel about the arrival of winter. With the sun getting lower in the sky every day we are benefiting from the solar heat gain. So now I look at the shorter days in a completely different way than I have in the past. I actually find myself looking forward to the next shorter day to see how much further into the house the beautiful sunshine will reach. To date, a sunny day will easily get the interior temperature to 24°+C, without the help of any other heat source.

The turtlenecks are still waiting for me. I say let them wait!

One thing Ras and I have both noticed is that 21°C feels warmer in this house than it ever did in the last house. 21°C was turtleneck temperature for sure (for me at least) in the last house and reason to bump the thermostat to 24°C. In this house, 21°C is perfectly comfortable. I continue to wonder if 21°C inside will still be comfortable when it's -21°C outside and the sun hasn't shone for 2 weeks.

It's the cloudy days for which we had to install the heat sources. So here's what heats the place.

Two Fujitsu air source heat pumps (16,000 BTU/h), one for each level.
One indoor heat pump head (white box on the wall, top right) on the main level.
One indoor heat pump head on the lower level.
Artwork still not hung making walls look too too naked.

Supplemental heat sources include...

Ditra-Heat in-floor heat in the master bath area.
There are 2 LED fireplaces in the house, one on each level. The electric
heat function was used toward our supplemental heat source calculations.
We only wanted the fireplaces for the (light) ambience. It's doubtful
we will ever use the heat function.


The building inspector was concerned we would have cold rooms in the house because the heat sources are centralized rather than ducted, therefore he insisted we wire for baseboard heaters in every room. Sacrilege! We wired to appease him but I refuse to let a baseboard heater anywhere near the place.

This past weekend we kept the door closed on the north-east-corner room on the lower level. There is no heat source in that room other than the east facing window. After 48 hours with the door closed the temperature was incredibly close to the rest of the house, almost imperceptible.

So far, the inspector has been proven quite wrong. I know it's still relatively mild compared to what we are in for but all the rooms in the house are comfortably warm. I haven't done my geek thing yet to measure temperatures room by room. That's a project I will get to. The ERV was just commissioned earlier this week so I didn't want to get too crazy measuring stuff until that was done.

Last, but not least. Our choice for water heating.

 80 gallon A.O. Smith air-source heat pump water heater.

We chose an air-source heat pump water heater for it's energy efficiency. Some would argue that the purchase price of the unit wipes out any savings gained by the lower energy usage. That may very well be true in this case too, but we needed the unit's efficiency and cooling capabilities to help with our passive house numbers. In for a penny in for a pound, as they say.

The water heater has worked like a charm...but it is noisy. The compressor runs at about the noise level of a canister-type vacuum. Until we get the insulated door on the utility room we have taken to switching the unit over to electric (silent) mode only when we have overnight visitors. I have checked the hydro website to compare electricity usage of both modes. The heat pump mode is definitely more efficient using about 4 kWh for one heating cycle vs about 10kWh during one heating cycle in electric mode.

Some advantages that this heat pump water heater has over a conventional water heater is that it cools the air in the room. That's how this water heater works...it takes the heat from the surrounding air to heat the water. Our utility/storage room is plenty big enough to accommodate the air volume needs of the water heater so we have not noticed that the air temperature in the surrounding rooms is noticeably cooler. This cooling feature will come in handy in the summer. As well, it dehumidifies the air. And...it keeps the air temperature of the utility room at the perfect temperature for storing wine. Bonus! Maybe the extra cost for the unit is not that bad after all.

That's enough for now...cheers,
Mimi


Monday 12 October 2015

First Annual Cold Turkey Plunge

I hope all you Canadians out there survived your over-indulgence of turkey this long Thanksgiving weekend. We did!

Just for fun, and mostly for our friends who have heard enough about passive house and long for something more fun to read about here on the blog, this one is for you.

Ras has decided that the Thanksgiving tradition here at Turtle Falls should be as invigorating as it is crazy. So she initiated the Cold Turkey Plunge. And believe it or not she was able to recruit four other keeners to join her. Here they are...

The brave ones...2 nephews, a sister, a sister-in-law, and Ras

Now let me explain why I am not in the picture. Someone had to take pictures. And since I actually have a degree in photographic arts, who better to take the photos? It matters not that my sister takes way better photographs than I do even though she doesn't have the 4 years of training under her camera belt as I do. It matters not that the water temperature was a seriously shivering 15°C (59°F). Someone had to document the First Annual Cold Turkey Plunge. Right?

Ok, the truth is...I'm a big wimp! Cold is not my cup of tea. 'Nuf said.

So here it is, as best I could do with only an iPhone for a camera in a 14' boat on a blustery day in front of the Turtle Falls dock...

Note how the instigator of the event is the first one to hit the water.
Note the passel of paparazzi shooting from behind.
Oh...that has got to be cold.
I'd say by the look on Ras's face that...yup...it's cold.

I've never seen so much clambering to be the first to get to the ladder. Note the nephew with the casted arm up in the air. Everyone blew past the poor dude trying to get out as fast as humanly possible. From the boat I kept wondering when someone was going to assist the one-armed lad out of the water. His mother finally offered a somewhat numbed helping hand.

The yelping was pretty impressive too. Our apologies to the neighbors if the commotion interrupted your peaceful Thanksgiving dinners.

I do have a little something-something for the readers that visit my blog strictly for passive house stuff. A product endorsement. In the cropped photo below, look at the cast protector on the arm of tall nephew. I said "the cast protector" people...eyes right. Eyes right!

No you have not been redirected to www.hot_1-armed_guys(dot)com

First I wrapped his cast with pallet wrap then taped that with Tuck tape, a clear plastic trash bag next, taped at the top with Siga Rissan tape for a water tight seal. It worked great...until it was time to unwrap him. Oh dear! Lordy, that stuff is sticky. I have to admit I started to sweat just a little when I was trying to get the tape to release from his skin. He smiled through the whole ordeal. He didn't spill any blood. I think he'll come back again to visit us.

These passive house sealing tapes really are sticky, seal tightly in some pretty wet conditions (a frigid lake dip then a hot shower to warm up) and will hold like crazy. I think we can rest assured our miles and miles of tapes will do their job for decades to come. I'm just thankful I didn't go that one step further and use the Dockskin primer on his arm before taping him up. ;)

I'll end my foolishness here.

Cheers,
Mimi